

The countdown to Madden NFL 27 has officially begun. EA Sports is preparing to launch the latest entry in its legendary football franchise on August 13, 2026, bringing major improvements designed to create a deeper and more realistic NFL gaming experience.
From improved gameplay mechanics to a completely redesigned Superstar Mode, Madden NFL 27 focuses on giving players more control both on and off the field. EA has described this year’s release as one of the most feature-rich versions of Madden, with updates across nearly every major game mode.
Release Date and Early Access Details
Madden NFL 27 will officially release worldwide on August 13, 2026.
Players can access the game earlier depending on their edition:
August 6 – Early access begins for eligible MVP+ members.
August 10 – Deluxe Edition and MVP Bundle owners can start playing.
August 13 – Global launch for all players.
The early access options give dedicated Madden fans a chance to experience the new features before the official release.
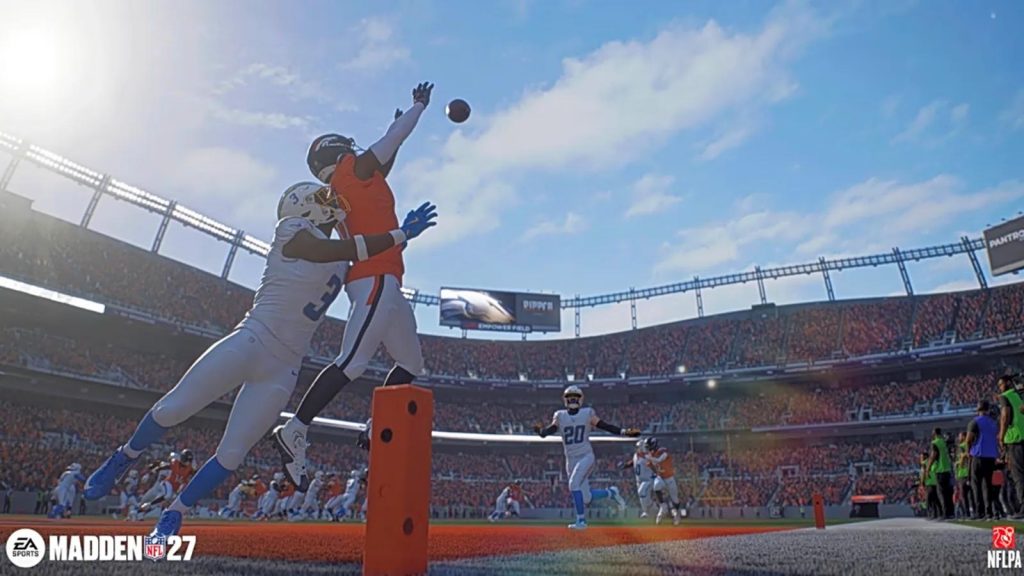
New Gameplay Systems Improve On-Field Realism
EA Sports has focused heavily on improving how Madden NFL 27 feels during gameplay. The goal is to create more realistic interactions between quarterbacks, receivers, defenders, and coaches.
Some of the biggest gameplay changes include:
Better defensive coverage intelligence
New WR and DB physical interaction systems
Timing-Based Catching mechanics
Improved ball carrier movement
Dynamic weather effects
Hot and Cold momentum system
New formation shifts
Custom defensive adjustments
Coach Mode gameplay
These improvements give players more strategic control and create more realistic football situations during every match.
A More Dynamic Franchise Experience
Franchise Mode has always been one of Madden’s most popular features, and Madden NFL 27 aims to make it deeper than ever.
The introduction of the Persona Engine creates more realistic player personalities and career motivations. Players will experience more challenges throughout their seasons, including:
Contract conflicts
Player demands
Free agency decisions
Team chemistry issues
Changing league stories
Smarter AI-controlled teams
The improved system makes every franchise journey different, allowing players to build their own unique NFL legacy.
Ultimate Team Progression Gets Major Changes
Madden NFL 27 Ultimate Team introduces new systems designed to make roster development more rewarding.
Players can expect:
New upgrade paths
Evolution cards
Improved objectives
More customization choices
Updated competitive systems
New seasonal events
Building a powerful Ultimate Team will require smart planning and effective resource management. Players looking to upgrade their lineups faster can find Cheap Madden NFL 27 Coins on z2u.com, helping them create stronger teams and compete more effectively.
Superstar Mode Expands the Player Career Experience
Superstar Mode is being transformed into a complete NFL career simulation. Players can now experience the journey from college football to professional success.
New additions include:
College Football 27 character imports
Expanded skill development
New position options
Career milestones
Relationship systems
Hall of Fame goals
The redesigned mode gives players more reasons to continue developing their characters throughout multiple seasons.
A New Level of NFL Presentation
Madden NFL 27 also improves the atmosphere around every game. EA wants players to feel like they are watching and controlling a real NFL broadcast.
The game introduces:
Updated commentary and broadcast packages
More realistic stadium environments
Improved player visuals
Dynamic lighting
Enhanced weather presentation
More authentic team traditions
These improvements help create a more immersive football experience from kickoff to the final whistle.
Final Thoughts
Madden NFL 27 is shaping up to be one of the most ambitious Madden releases in years. With major updates to gameplay, Franchise Mode, Ultimate Team, Superstar Mode, and presentation, EA Sports is aiming to deliver a more authentic football simulation for both new players and longtime fans.
As the August 13 release date approaches, more information about player ratings, launch events, and additional content will continue to be revealed. Football fans can look forward to a new Madden experience built around realism, strategy, and long-term progression.